Install SNMP Agent and configure the community string
Orion Platform products use the Simple Network Management Protocol (SNMP) to collect detailed information about your server. While configuring SNMP, certain values are already pre-configured for you. This is by design, to ensure that your server is monitored properly. There are some settings that you will not be able to configure.
Windows 10, Windows Server 2016, Windows Server 2019
- Open the Control Panel on your Windows machine.
- Open the Programs and Features.
- Select Turn Windows features on or off.
- On Windows workstations (Windows 10) select Simple Network Management Protocol (SNMP) and install it.
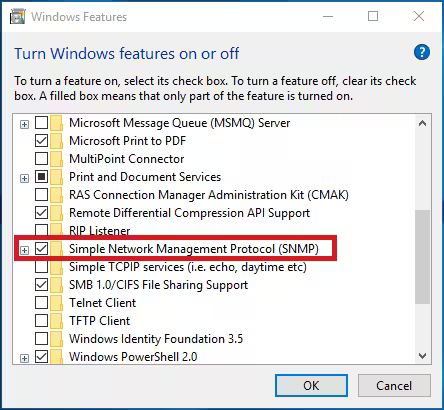
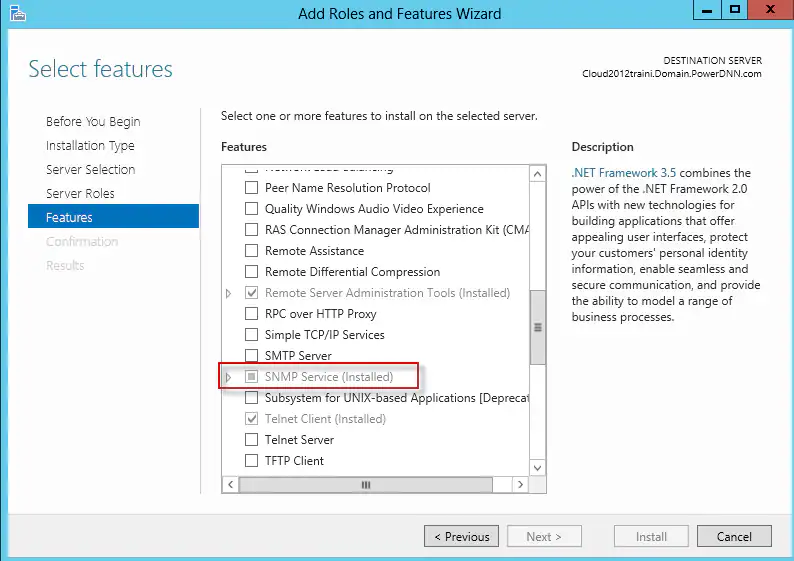
- On Windows Server 2016 and above you’ll have to click Next in the Add Roles and Features Wizard until you reach the Features sections where you can install the SNMP Service.

- Install SNMP Service
NOTE: The system will automatically install SNMP Tools required by the service.
After installing the SNMP service, configure it appropriately.
- Run
services.mscas administrator. - Navigate to the Properties of the SNMP service.
- Select Automatic as the Startup type. The service always runs, even after turning your computer off and on again.
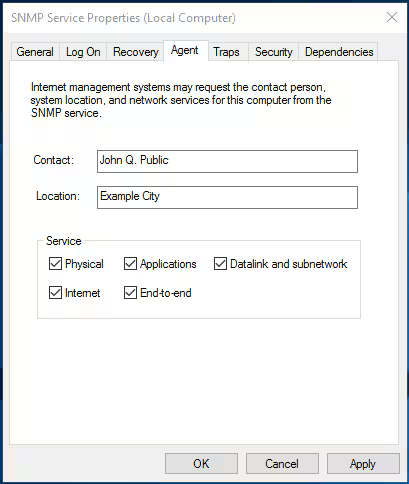
- For monitoring purposes, select all of the services on the Agent tab to have all SNMP properties available.
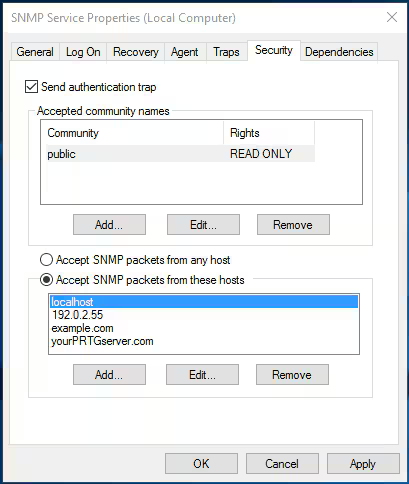
- Click on the Security tab and adjust the security parameters like the community string and the IP/host filter list to your security compliance. For example, add the community string
publicwith READ ONLY rights and accept SNMP packets from at least the address of your monitoring server.
Windows 8, Windows 8.1, Windows Server 2012, Windows Server 2012 R2
- Log into your dedicated server using Remote Desktop
- Click on Windows Key > Administrative Tools > Server Manager.
- Click Manage > Add Roles and Features.
- Click Next > Next > Next > Next. Verify SNMP Services are installed.
- Click Cancel.
- Click on Windows Key > Administrative Tools > Services.
- Right-click on SNMP Service and click on Properties.
- Click on the Security tab.
- Click on Add.
- Set the community string to Read Only, not Read Write.
- Type your randomized 8-10 characters long community string.
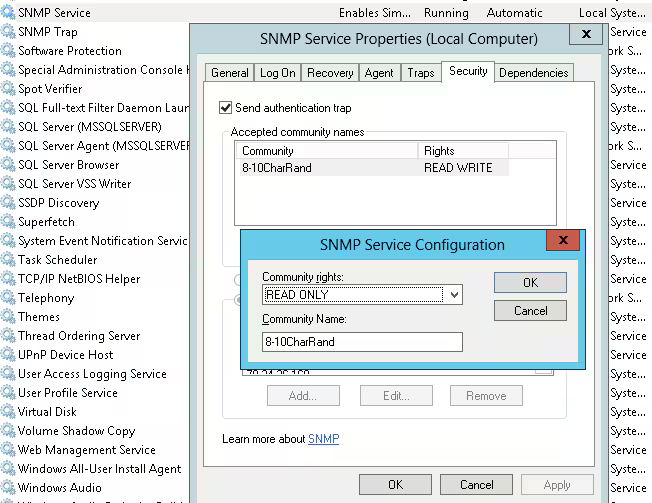
- Click on OK.
- Click on OK.
Configuring SNMP for Windows Server 2016 and Windows Server 2012
To configure SNMP on a Windows server, you must:
Configuring Ping Responses
For SL1 to discover a device, including SNMP-enabled devices, the device must meet one of the following requirements:
- The device must respond to an ICMP “Ping” request.
- One of the ports selected in the Detection Method & Port field for the discovery session must be open on the device. If the Default Method option for the Detection Method & Port field is selected, SL1 scans TCP ports 21, 22, 23, 25, and 80.
The default configuration for a Windows Server does not allow ICMP “Ping” requests and does not allow connections to TCP ports 21, 22, 23, 25, or 80. Therefore, to discover a Windows Server in SL1, you must perform one of the following tasks:
- Reconfigure the firewall on the Windows Server to allow ICMP “Ping” requests. This section describes how to perform this task.
- Reconfigure the firewall on the Windows Server to allow connections to port 21, 22, 23, 25, or 80. If you have already configured your Windows Server to accept SSH, FTP, Telnet, SMTP, or HTTP connections, this task might have been completed already. You should perform this task only if you were already planning to allow SSH, FTP, Telnet, SMTP, or HTTP connections to your Windows Server.
- When you create the discovery session that will discover the Windows Server, select at least one port in the Detection Method & Port field that is open on the Windows Server. For example, if your Windows Server is configured as an MSSQL Server, you could select port 1433 (the default port for MSSQL Server) in the Detection Method & Port field.
To reconfigure the firewall on a Windows Server to allow ICMP “Ping” requests, perform the following steps:
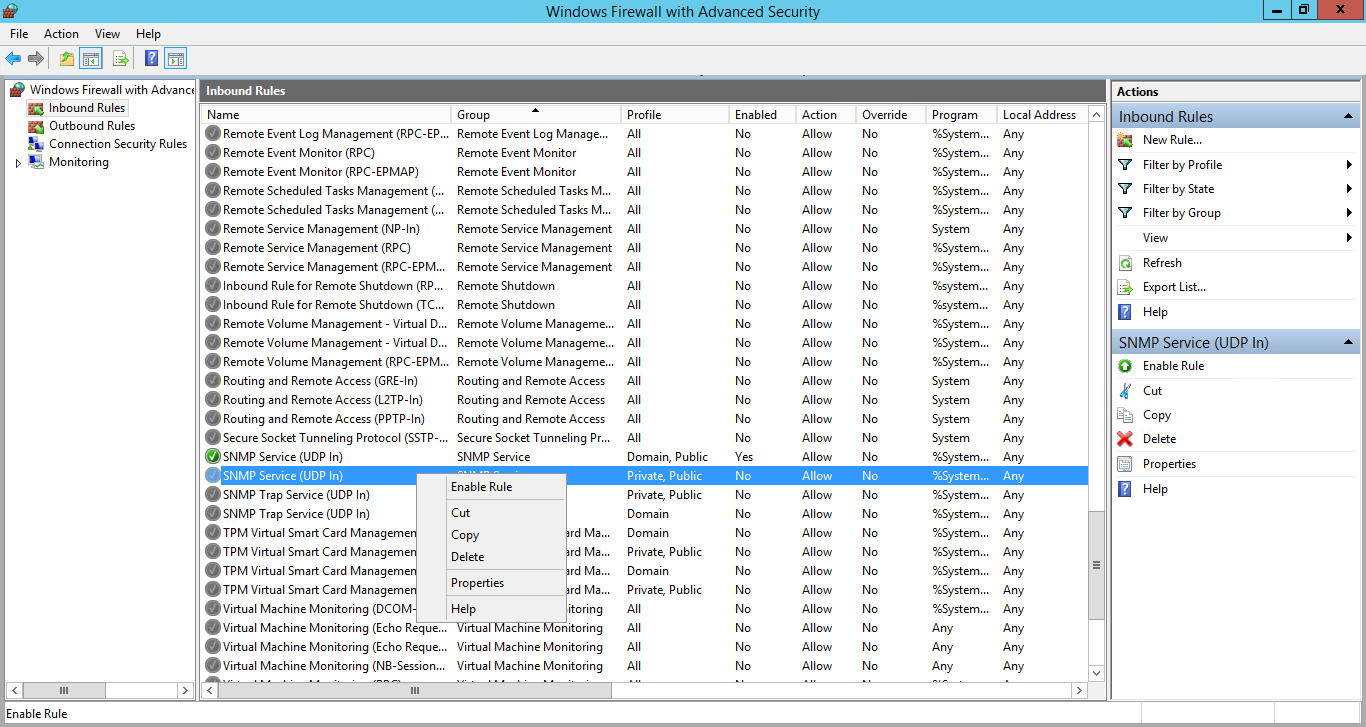
- In the Start menu search bar, enter “firewall” to open a Windows Firewall with Advanced Security window.
- In the left pane, select Inbound Rules.
- If you want SL1 to discover your Windows Server using an IPv4 address, locate the File and Printer Sharing (Echo Request – ICMPv4-In) rule.
- If you want SL1 to discover your Windows Server using an IPv6 address, locate the File and Printer Sharing (Echo Request – ICMPv6-In) rule.
- Right click on the rule that you located, then select Enable Rule:
سلب مسئولیت: لطفاً توجه داشته باشید، شما انتخاب می کنید که با مسئولیت خود از محتوای این آموزش و سایر آموزش های سایت استفاده کنید و ملیکلود هیچگونه مسئولیتی در نحوه استفاده شما و مشکلات احتمالی ندارد.
